


How to Draw Realistic Lips Step by Step
 Most people who love to sketch should be keener on sketching realistic portraits. Whenever you’re creating realistic portrait drawings, lips outline is one of the most important features. They can help define how a portrait looks as they are an important part of our expressions. You are always grasping to get the right angle of the lips in the portrait drawing. In other words, if you're drawing a portrait from a side view, you'll need to make sure your lips are at the appropriate angle as well. This tutorial will show you how to draw different pairs of lips step by step in easy ways, so you can follow along to help you with your next portrait artwork. Let's prepare some sketching supplies, and see how we draw realistic lips.
Download Free Step-by-Step Guide:
How to Draw Closed Lips in the Frontal View
Realistic Lips Drawing in Pencils:
70 Pcs Drawing And Sketch Pencil Set
How to Draw Closed Lips in the Frontal View

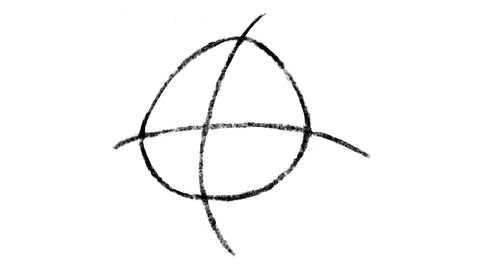
Step 1. Draw a cross and a pair of marks
Before drawing lips, we need to draw a cross first, mark the top and bottom and make sure that the bottom is larger than the top. Connect the endpoints of both marks to the endpoints of the cross with straight lines.
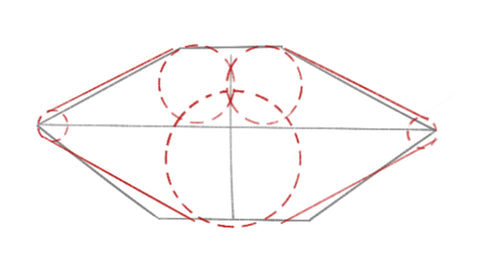
Step 2. Draw 5 circles to define the volume of the lip
Draw two small circles next to each other along the upper cross lines first, The two circles are symmetrical about the mid-line. Then draw a large circle below the center points of the two circles to determine the thickness and curvature of the lower lip.

Step 3. Smooth the outline of the lip and erase the doted guide lines
In this step, you need to connect the ends of the lips to the border of the large circle and make the outline of the lip smoother and softer. After that, erase all the interior, and preliminary lines and complete the lips sketch. Now we've done the comparably hard part of lip drawings.

Step 4. Shade the lips and add the lip wrinkles
Grab an HB pencil and add shadows for the upper and lower lips. After this, we can use a 6H pencil to create some lip wrinkles. It will be difficult to achieve the effect as it cannot be pressed too hard or else.

Step 5. Repeat the shading and clean up the highlights
Repeat step 4 following the directions of arrows and create a glare effect for the bottom lip by using the pointed end of kneaded eraser to go over the light areas and clean up the highlights.

Step 6. Darken the shadows in areas and touch up the lips
We will finish the lips drawing tutorial in this step. This step is aiming to add the final touch to the lips, refine the subtlety of the tone, and soften the shading lines to define the accents of the lip's outline. To create smoother shading effects, we need to use a clean blending stump on the bottom lip, making the lips look more plump and round.
How to Draw Opened Mouth with Teeth
Step 1. Draw a cross in an oval
Draw a vertical arc and mark the top and bottom. Draw an oval evenly on the cross. The left and right sides of the ellipse are roughly the same distance.

Step 2. Draw bow on the top
Draw the concave lip arch on top of the oval.

Step 3. Draw the upper lip
Take a point between the lip arch and the intersection, and draw a semicircle connecting the two ends of the ellipse to represent the upper lip. Connect the top and bottom of the ellipse with the triangle on the right.
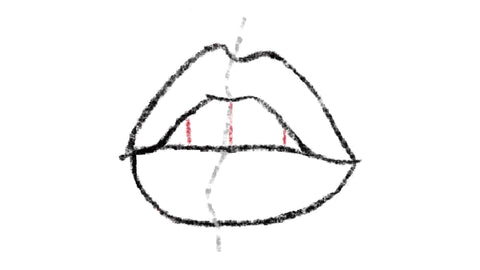
Step 4. Draw the teeth
Following the directions, add a few vertical lines in the middle of the lips to draw the shape of the teeth.

Step 5. Erase the guidelines
Now that we have finished the line drawing of the lips, we can erase the extra guide lines

Step 6. Create some lip lines
To help you see the volume of the lips, we can add some vertical semicircular lines and arcs to the lips to set up the lip shadow later

Step 7. Add some shadows on the lip
We are ready to color. First lighten the construction lines with an eraser and prepare to add shading to your drawing. Use the HB pencil to start tinting around the left side of the lips. Next, start coloring the lower lip along the separated arc. Darken the overall lip color on the left side, giving the impression that the light is hitting from the right side.

Step 8. Darker the shades
In this step, we need to add darker shadows and midtones. Add shading to the teeth starting with the upper lip.

Step 9. Refine the details
We can erase some of the shadow on the right and use it as a highlight, deepen the shadow on the left, increase the contrast and add some lines to the upper lip for added realism.
Your Finished Pencil Drawings of Lips
Well done! You successfully completed all the easy steps and got a perfect lip! You know how to draw a lip easily now! You can use these steps to add lips to a variety of portraits or you can add special curves to create a different personality of the lips. Some artists are very obsessed with drawing facial features, such as lips, nose and eyes. Once you are familiar with the steps of drawing realistic lips, you can try to draw lips from other angles or the lips under other expressions on your own. We will make more realistic drawing tutorials in the future, let's look forward to it!


Wow.. Can you teach me how to draw