


How to Draw Water Droplets Step by Step
 For many junior painters, draw a water droplet can be a complex thing because it is supposed to be transparent and will show highlights and shadows in a unique way. You'll find that by using shadows and highlights in the right places, you can make your drawing appear to jump off the page. I have break down how to draw a droplet of water into simple steps in this water droplet drawing tutorial so you can easily follow along.
I used a nice set of 35 Pcs Professional Drawing Sketching Pencils for this drawing. It includes 14 drawing pencils, 1 woodless graphite pencil, 3 black charcoal pencils, 3 charcoal sticks and more. These tools can be used to add plenty of value to your project and create beautiful graphite artwork.
List of Supplies:


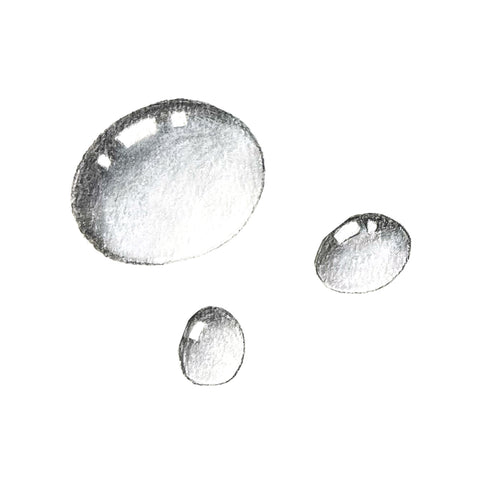
Step 1. Draw three imperfect circles
First, let's draw several imperfect circles of different sizes. For this tutorial, we decided to draw three water droplets because such a composition would be more balanced and exciting. Of course, if you want to practice or try it out first, you can start with just a single drop of water. Your first circle should not be too small so that you can easily go through each of the following steps and allow you to replicate that circle in other different sizes successfully.

Step 2. Preliminary cast a shadow on the upper left corner of the circle
Now that we've settled on the essential placement and shape of the droplets let's start adding shadows! We all know that water is usually transparent, which means it will be the color of its surroundings. When we draw water drops on a white background, because the water droplets are three-dimensional and there is a particular light and shadow relationship, they will be slightly darker than the white paper.
So in this step, we start shading and controlling the shadows to give volume to the water droplets. It would be best to decide where the light will fall on the drop in advance. In our water droplets drawing, the light falls from the left side of the top. This means that we will use a pencil to make shades cover more than half of the water droplets. Pay attention to the darker, the closer to the edge, the lighter, the lower right corner until colorless.

Step 3. Repeat the last step and blur the shades
This step is relatively simple, repeat the action of the previous step. Pay attention to keeping the pencil obliquely facing the paper at 45 degrees, try to weaken the layering of the shadow, and then use the paper stump to blur the edge of the shadow.
Step 4. Blend and integrate the shades
After blending the shadows, we already know our light falls on the droplet from the top left corner. Where the light touches the droplet, a highlight area will appear, which is the area in the lower right corner of the droplet. To create this effect, we'll use a white charcoal pencil to fill the droplets. White charcoal works well on paper and leaves bright white highlights wherever you want.

Step 5. Add shadows to each of the realistic water droplet
If there is light coming from the inclined plane, there must be shadows of the objects. They usually appear on the other side of the light source. We can draw dark arcs under each drop to represent their shadows.

Step 6. Optimize the details and blend the shadows
As with the edge shadows in step 3, we first blend the shadows from the water droplets by paper stump to make them appear softer and more diffuse, just like our shadows.
The water drop drawing is done at this point! Don't worry if your first drawing isn't perfect. The coloring of transparent 3D objects takes some time to understand. Keep practicing so you can see your progress over time. Come and share your finished drawing of water droplets with us on social media and leave a comment for any other helpful tips or tricks!


